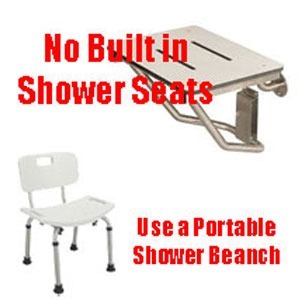
 The Solid Mount® is specifically engineered and designed for a single purpose: mounting grab bars into fiberglass surrounds. It is not intended for any other use, and using it for alternative purposes may compromise safety. For instance, attempting to mount a shower chair or bench with The Solid Mount® is not recommended. The design and testing processes for grab bars take into consideration factors such as sheer strength and pull-out resistance. Introducing a shower chair or bench alters these conditions. To ensure safety, we advise installing grab bars using The Solid Mount® and separately acquiring a mobile shower bench or chair to be placed within the shower or tub.
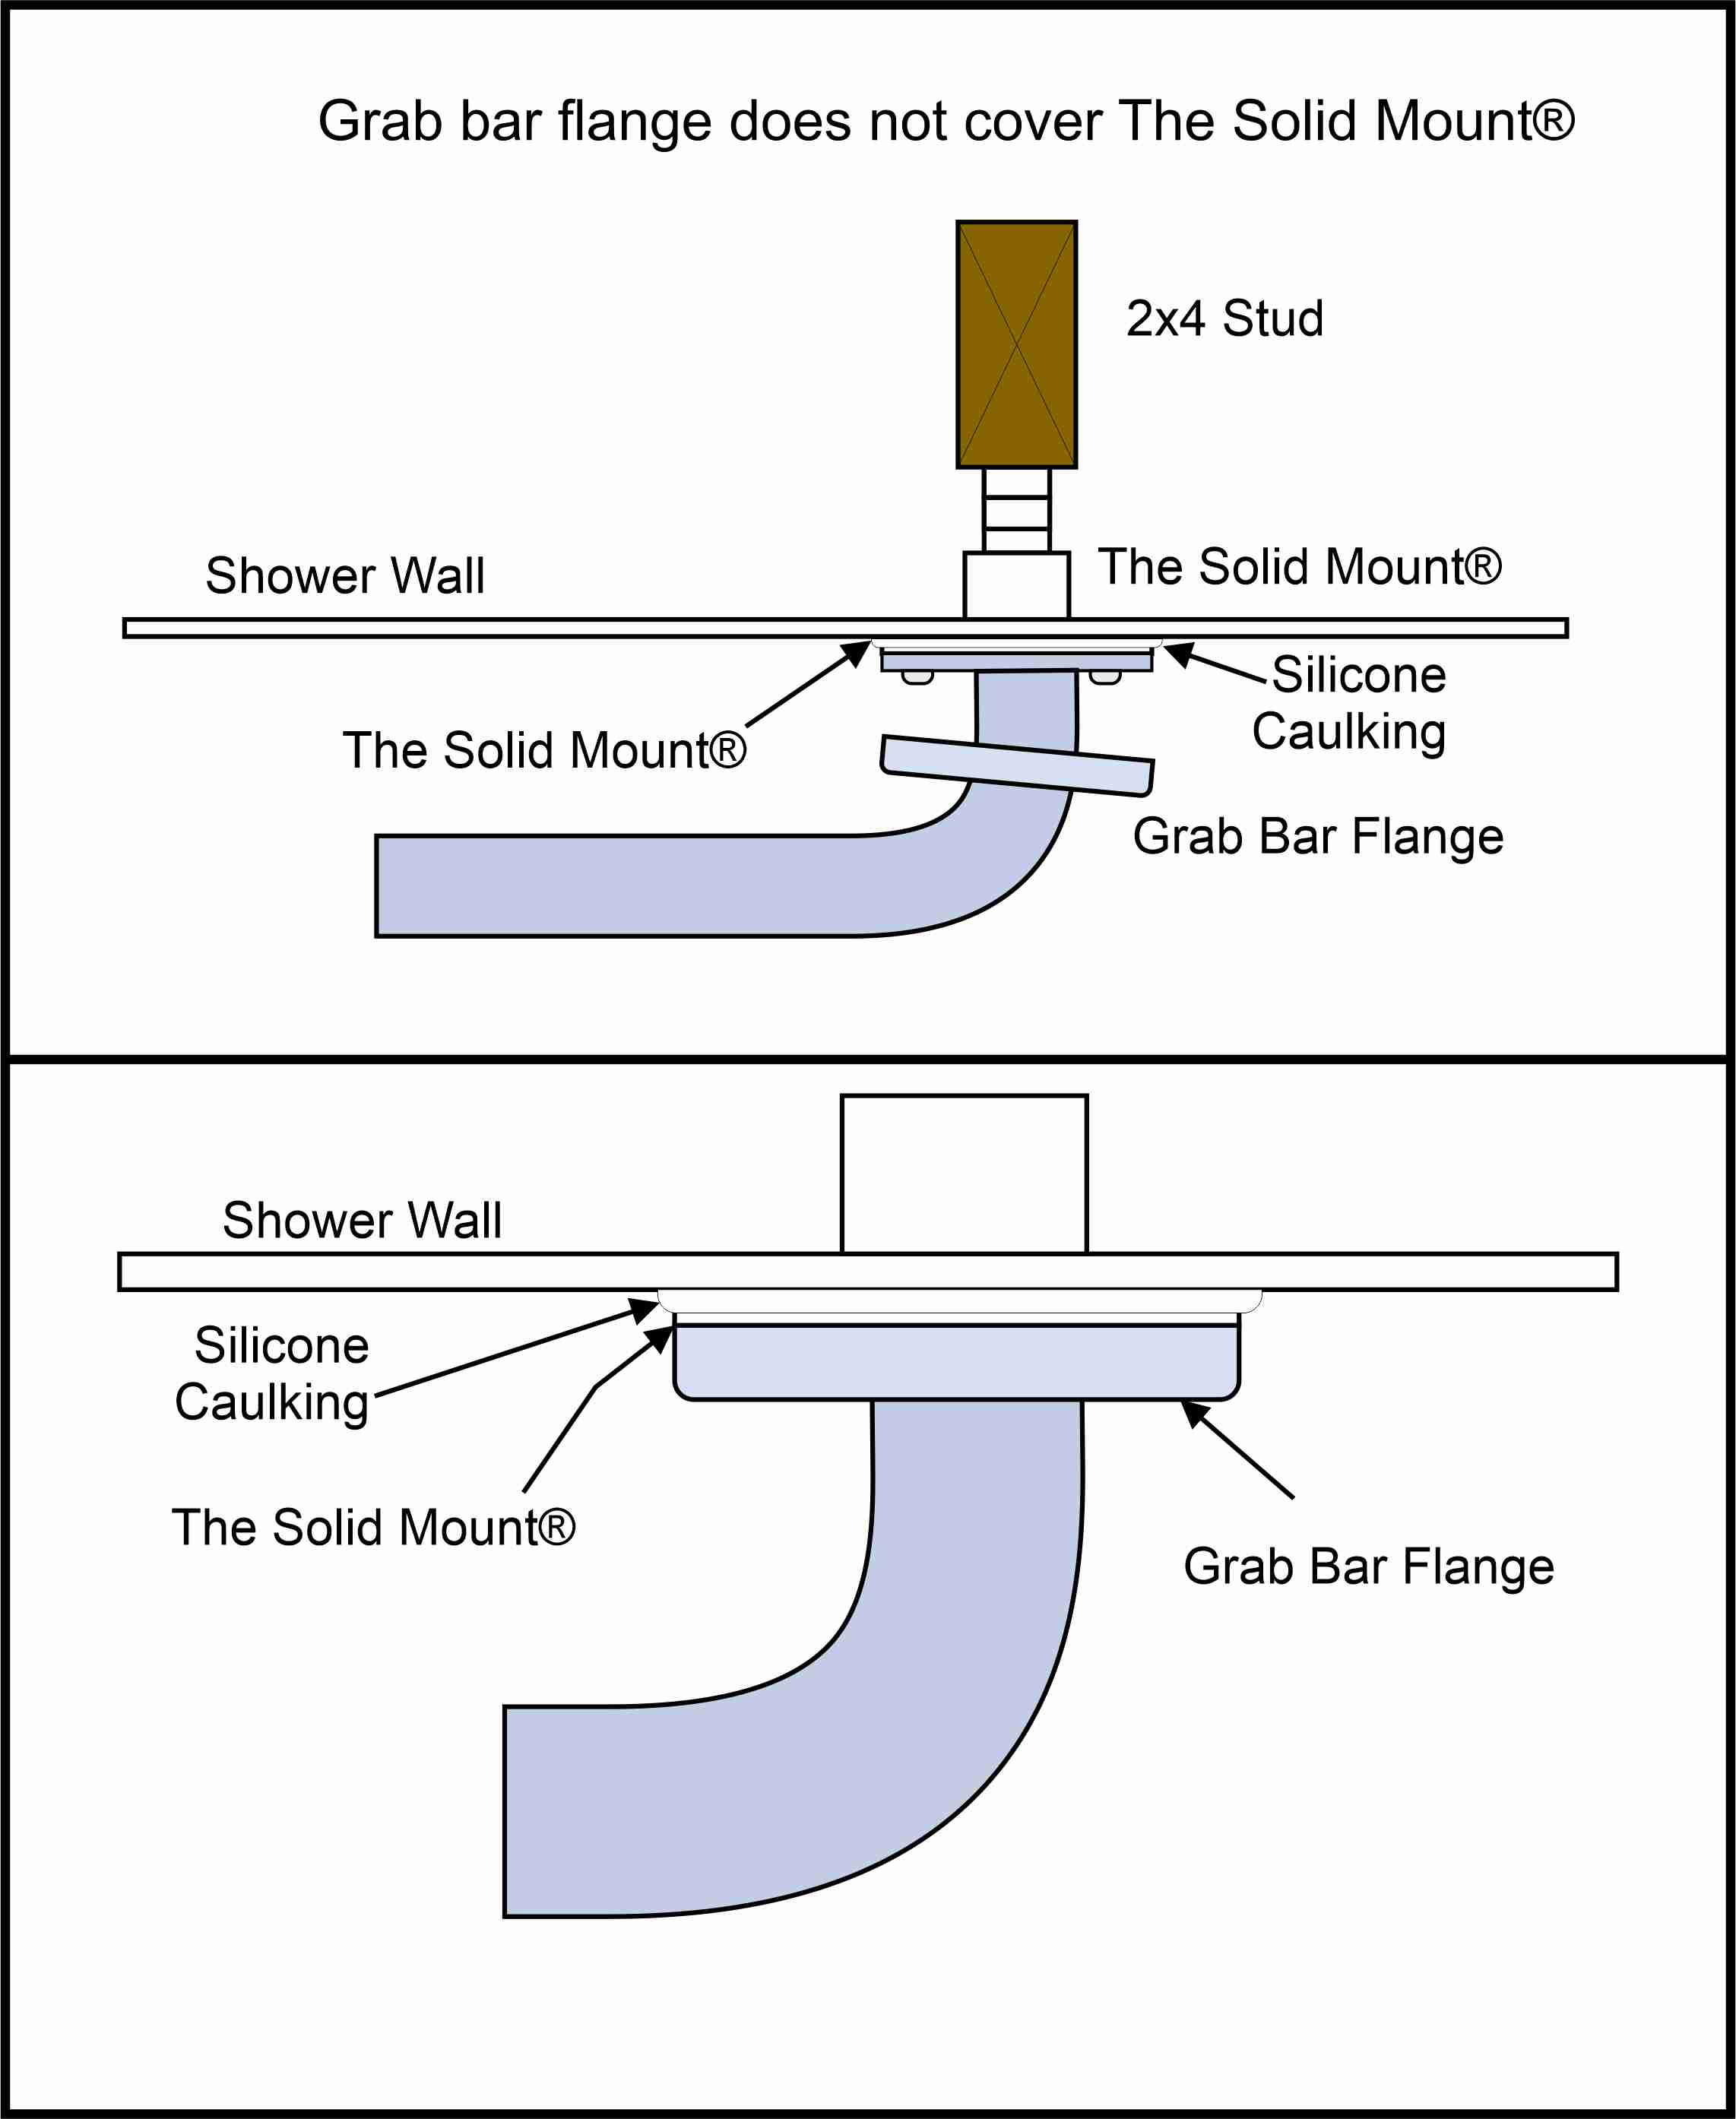
The Solid Mount® is not designed to be covered by the grab bar flange for good reason, flanges on the grab bar are not designed to cover anything more than the flange of the grab bar and the screws.
This is from one of the largest garb bar manufacturers’ response to a customer from their website, “We take consumer comments very seriously and we are delighted to have the opportunity to assist you. The grab bar flanges are designed to cover the included mounting bracket only and are not designed to cover 3rd party mounting kits.” (Double click on the image to enlarge it.)
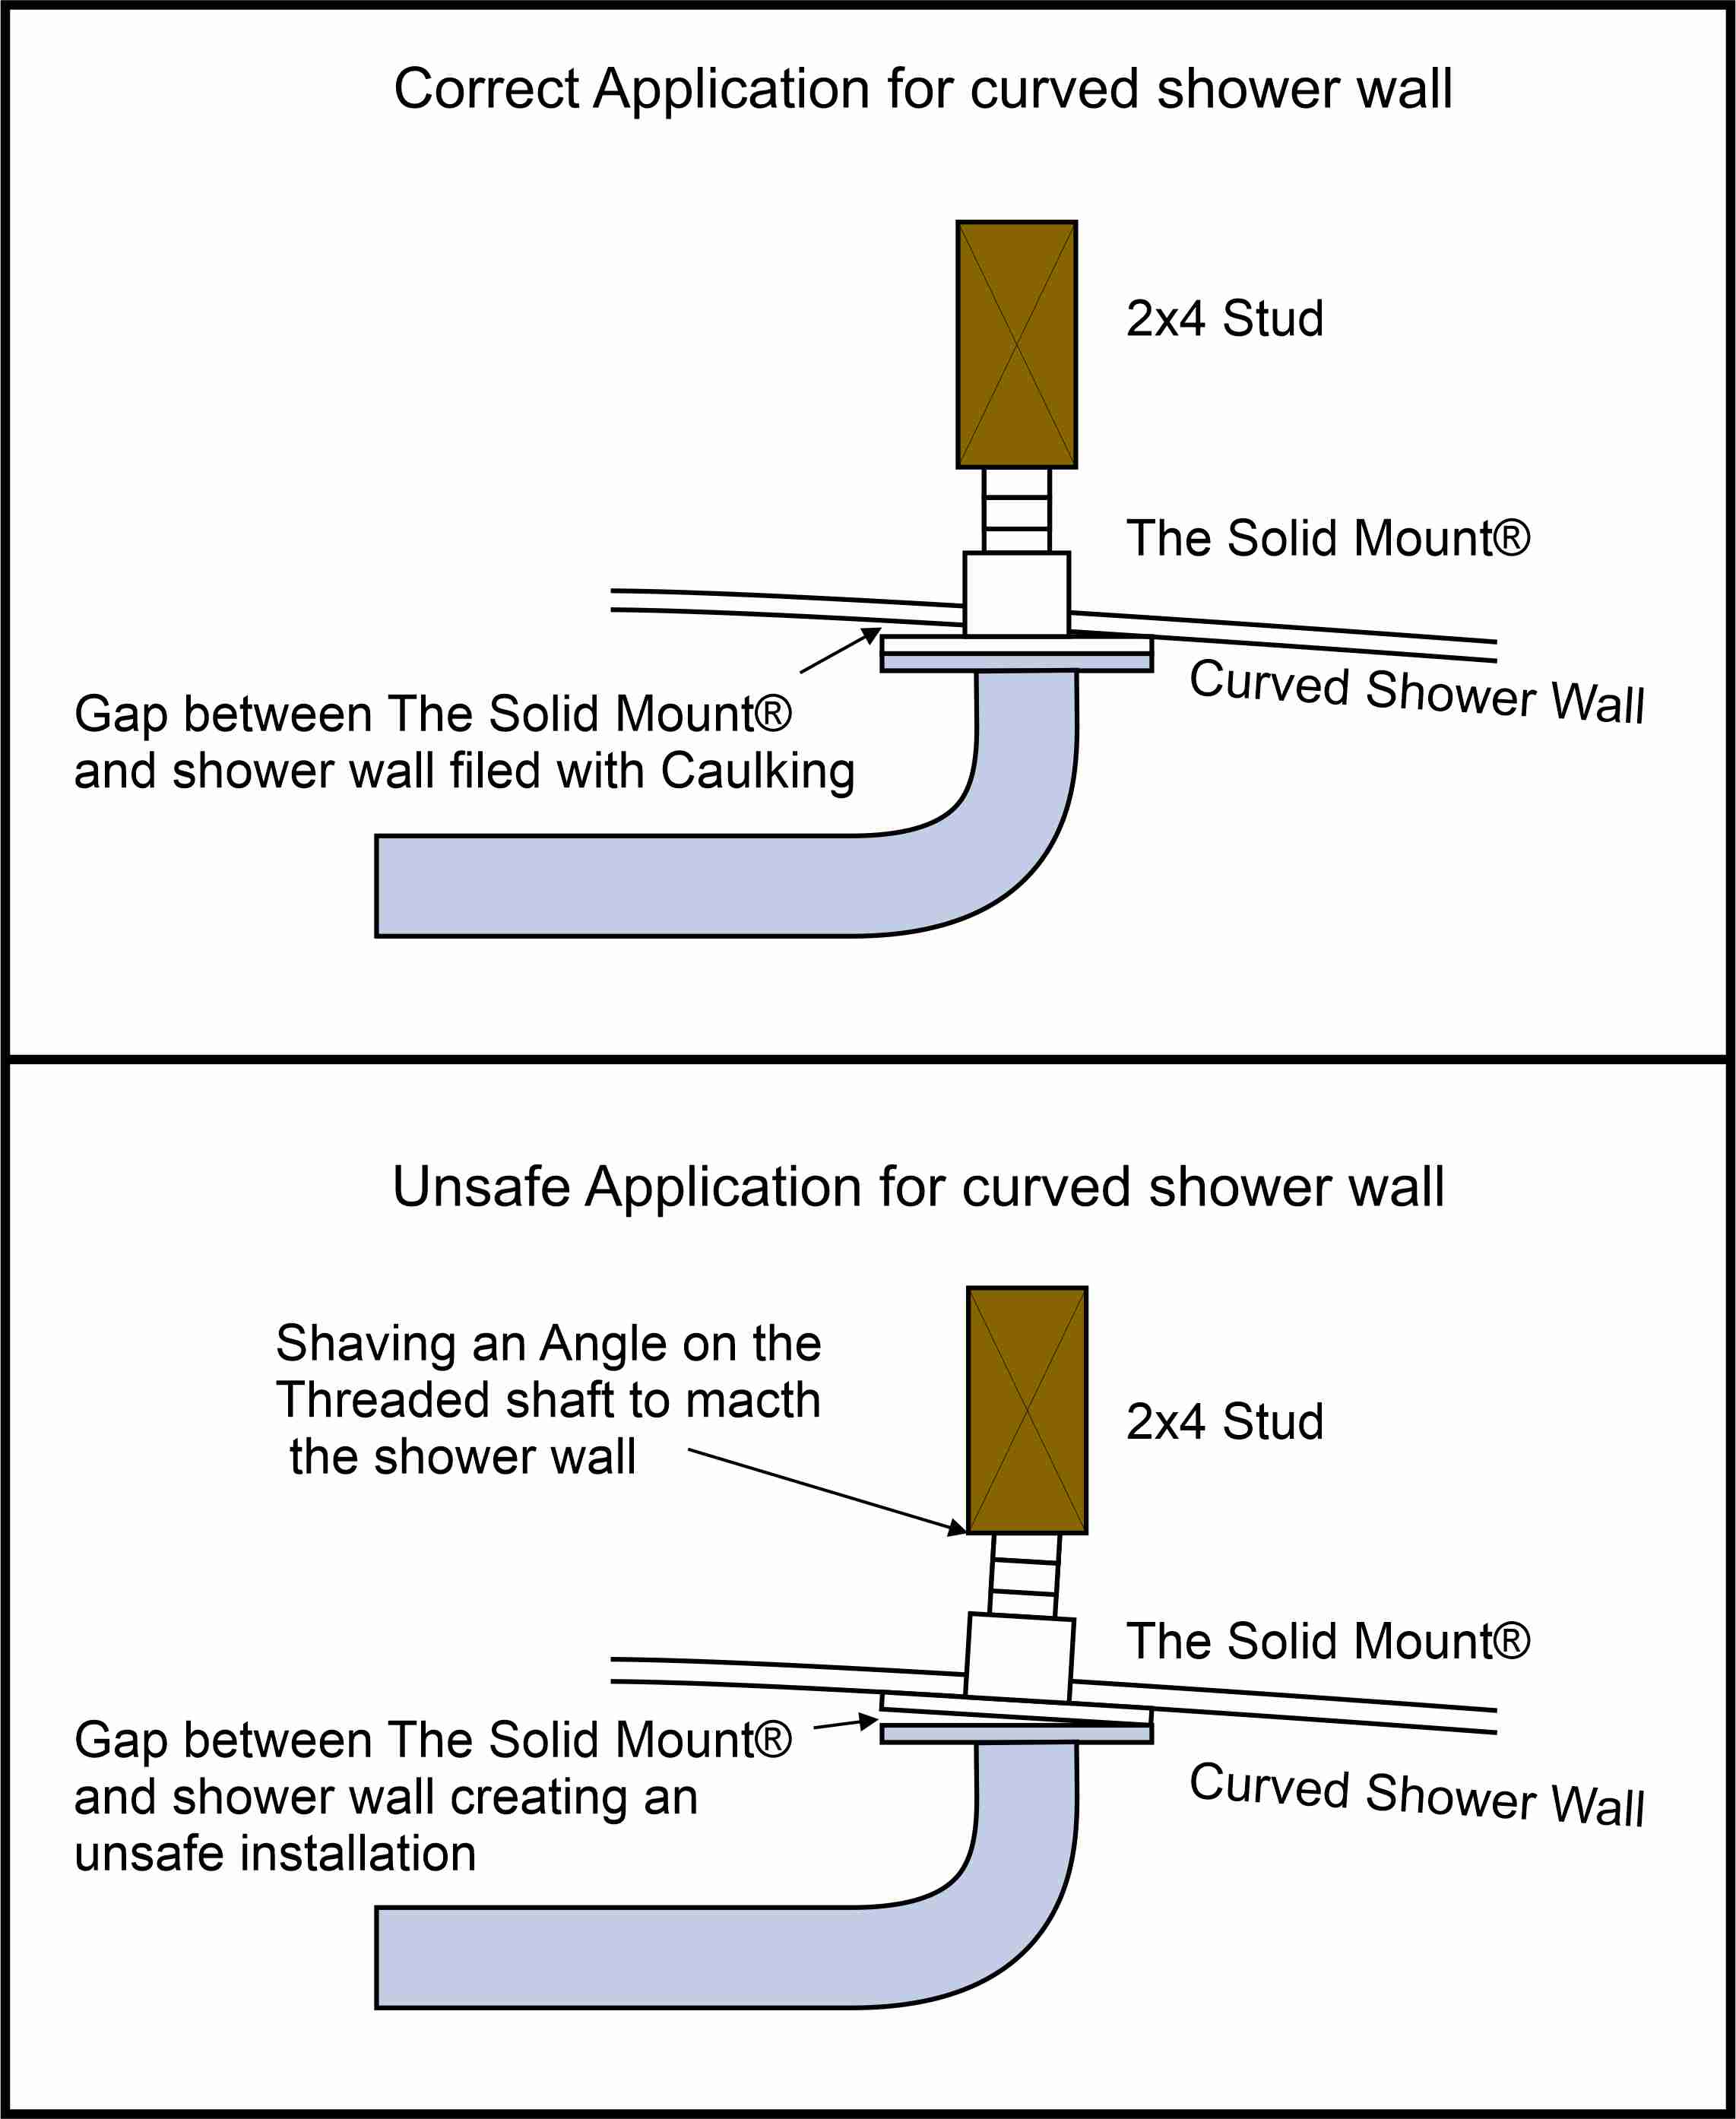
Curved shower walls are not an obstacle for installing The Solid Mount® in fiberglass showers. Despite some floating ideas like shaving an angle on the threaded shaft to angle the bar, the correct process is actually very simple. By following the instructions, you can easily install the bracket, even if one side has a larger gap than the other. Simply fill in the gap with caulking. While it may not be the most aesthetically pleasing solution, it is a practical one that saves you time and money. There’s no need to tear out the back wall and add blocking. Don’t waste your energy on a complete shower replacement. With The Solid Mount®, you can confidently install grab bars in your curved shower. (Double click on the image to enlarge it.)
 Plastic is commonly associated with being cheap or not very strong. However, this perception is based on a misunderstanding of the term “plastic.” In the case of The Solid Mount®, we use an extremly strong 6000psi proprietary blend consisting of three different materials and exclusive additives, enhancing its exceptional strength. It’s important to note that various components in machinery, cars, motorcycles, and other products share the same foundation of the 6000psi mix we use. When installed correctly, The Solid Mount® not only meets but exceeds the standards set by the A.D.A. Title III Regulations and Canadian specifications, supporting loads over 300lbs.
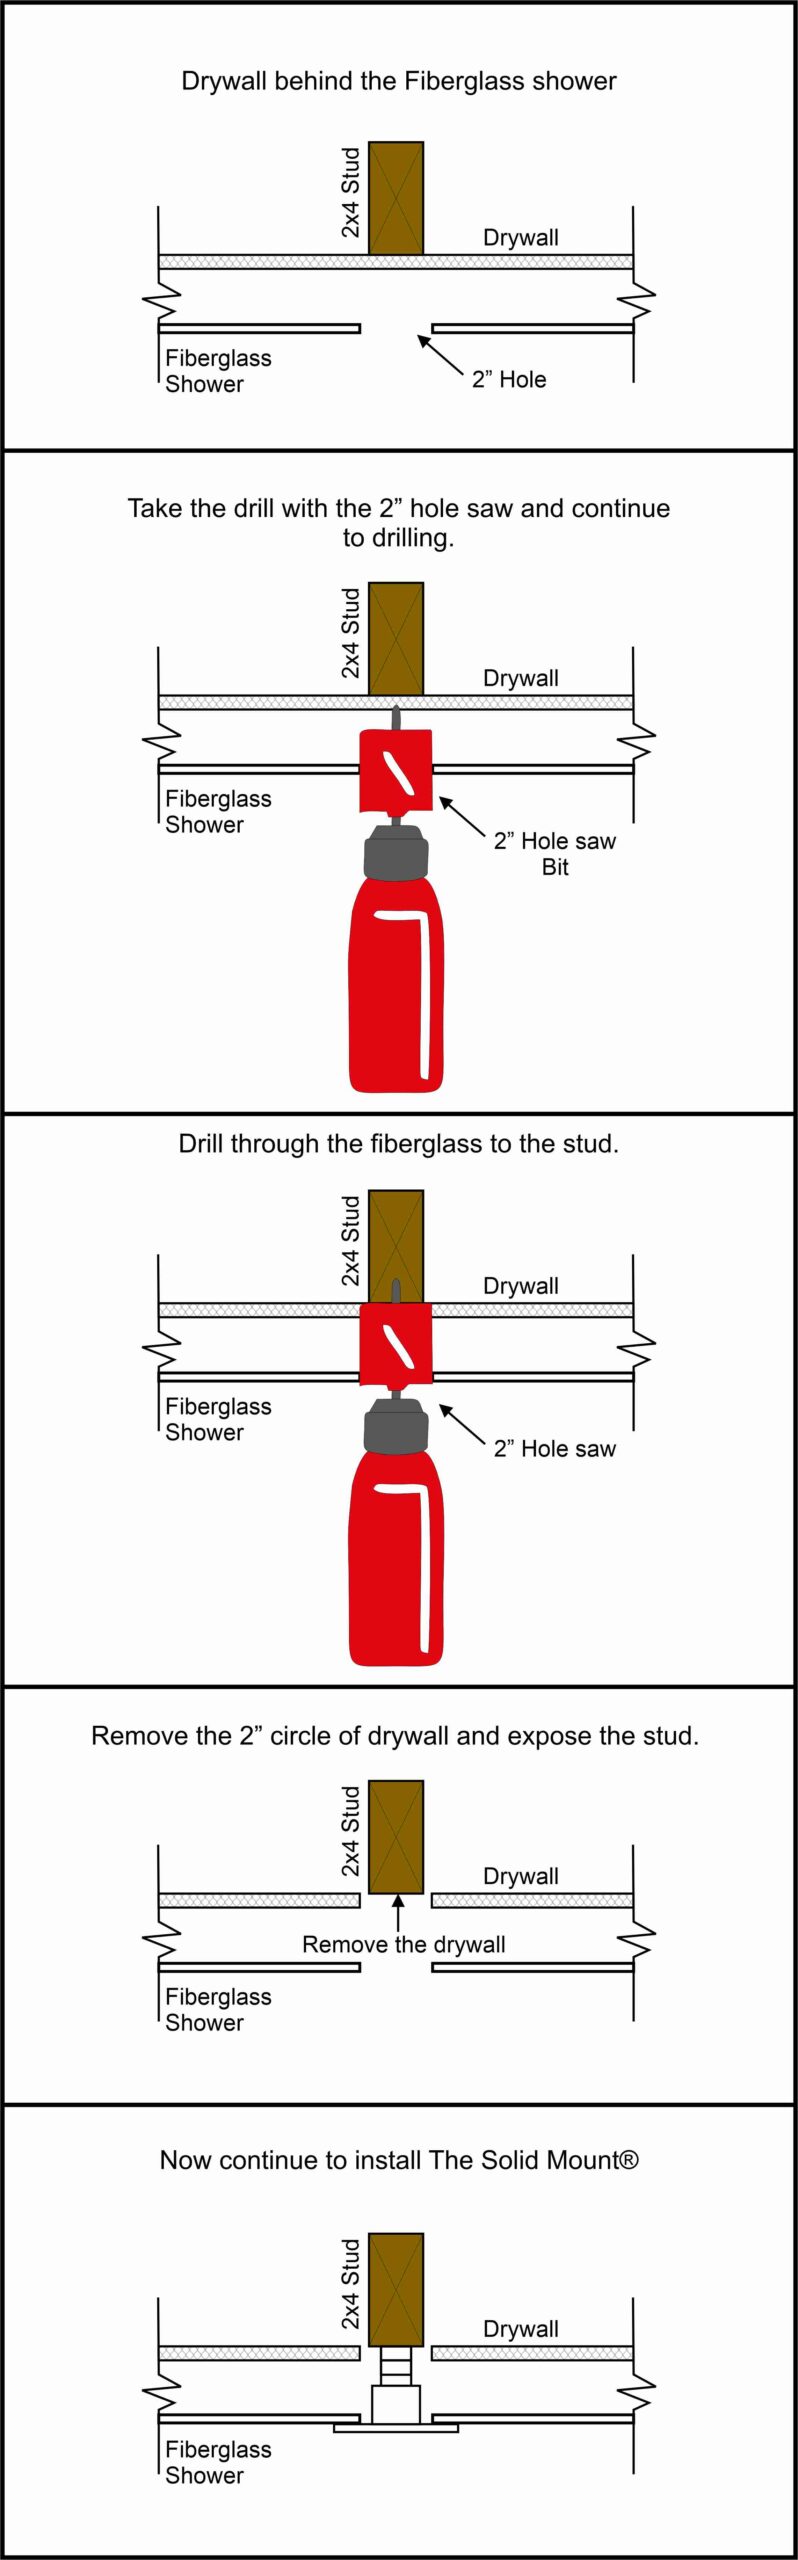 Depending on your location, you may discover drywall behind the fiberglass shower. While this isn’t a significant problem, it does require a few additional straightforward steps. Click on the image to view the necessary procedures. Utilizing the 2″ hole saw to drill through the drywall and extract a 2″ section in front of the stud. Following the removal of the drywall, proceed with the installation of The Solid Mount® according to the provided instructions. (Double click on the image to enlarge it.)
 This situation may seem like a disaster – drilling a 2″ hole in your fiberglass shower might appear to prevent the use of this incredible product. However, fear not. The Solid Mount® is highly versatile, and we have a solution for you; it just requires a bit more time and an additional tool, a 1.5″ spade bit. While this step can be a bit precarious, we recommend using a brand new, sharp spade bit and taking your time. We’ve provided detailed steps along with accompanying images to guide you through the process safely. (Double click on the image to enlarge it.)
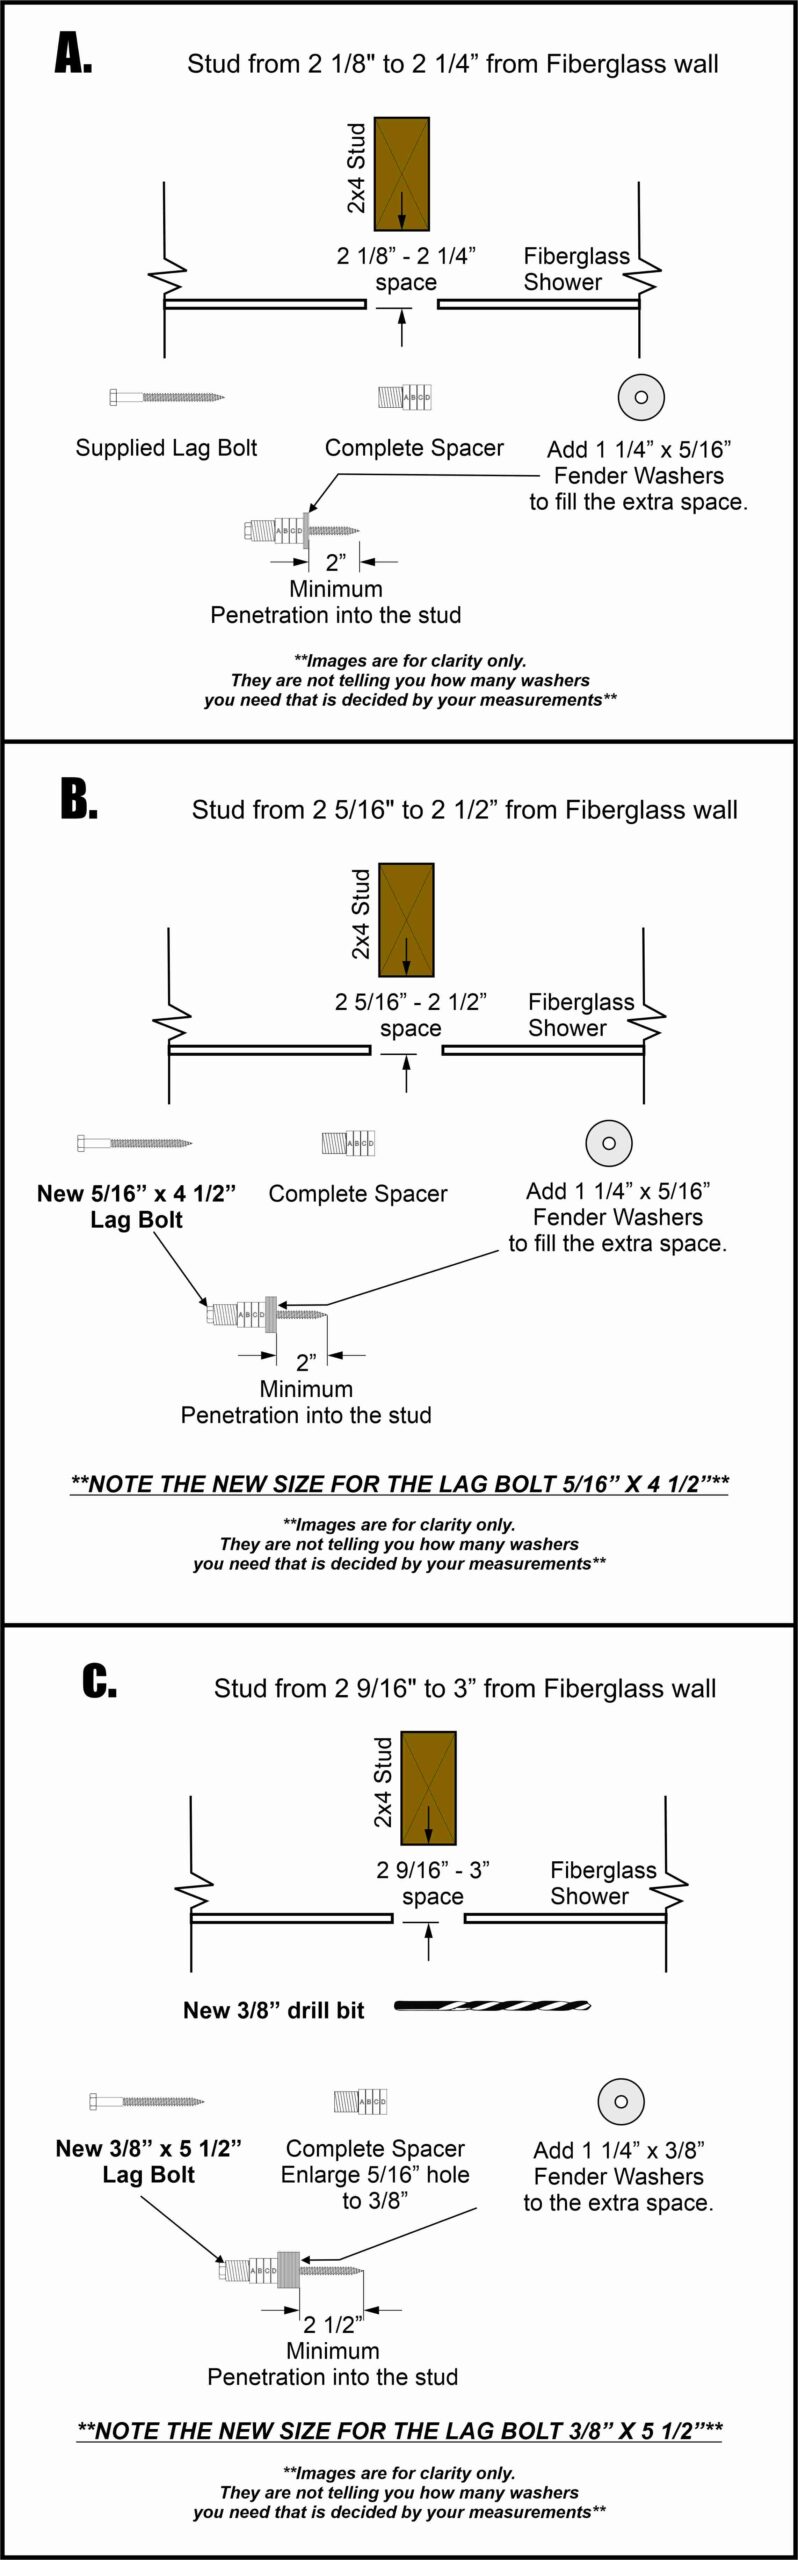
While not a significant issue, it is important to address it properly to maintain the structural integrity of The Solid Mount®.
If the gap measures between 2 1/8” to 2 1/4” (See image A), a straightforward solution is recommended. Utilizing the spacer in its current state would result in approximately 2 1/4″ penetration of the lag bolt. We suggest a minimum penetration of 2”, thus for a gap of 2 1/8” to 2 1/4”, acquiring about 4 – 5/16” x 1 1/4” fender washers depending on the brand to fill the gap. Make sure you still have 2″ of lag bolt for penetration.
For larger gaps ranging from 2 5/16” to 2 1/2″ (See image B), the same washer solution applies, along with the replacement of the lag bolt with a 5/16” x 4 1/2” to ensure a minimum 2” penetration.
For spaces exceeding 2 1/2″ up to 3” (See image C), a more thorough approach is warranted. Begin by obtaining a 3/8” drill bit and a 15/64″ drill bit for the pilot hole, and a supply of 3/8” x 1 1/4” fender washers to fill the gap. It’s vital to maintain uniformity in washer size. Additionally, enlarge the 5/16” hole in the spacer to 3/8” to accommodate the larger lag bolt. You can achieve this by using a 3/8″ drill bit, ensuring a snug fit for the 3/8” lag bolt. Lastly, acquire a new 3/8” x 5 1/2″ lag bolt, ensuring it penetrates at least 2 1/2″ into the stud for optimal stability. Also use the 15/64″ drill bit for the pilot hole for the 3/8″ lag boltWe need to change the 5/16″ lag bolt to a 3/8″ lag bolt with 2 1/2″ of penetration due to load changes. (Double click on the image to inlarge it.)
**Notes**
*Only use the fender washers to fill the extra space*
*ANY GAP OVER 3″ WE STRONGLY ADVISE AGAINST IT.*
*DO NOT USE THE SOLID MOUNT® FOR SHOWER CHAIRS*